


Guide: installing a lambda sensor
1. Placement in the exhaust system
The lambda sensor must be installed in the exhaust pipe before the catalytic converter so it can measure the correct oxygen content in the exhaust gas. It should be placed where the exhaust gases from all cylinders have mixed, but not too close to the engine, as excessively high temperatures can damage the sensor.
2. Distance from the cylinder head
The recommended distance is approximately 90 centimetres from the engine’s cylinder head. If the sensor is mounted closer to the engine, it will be exposed to higher heat and thermal shock, which significantly shortens its service life.
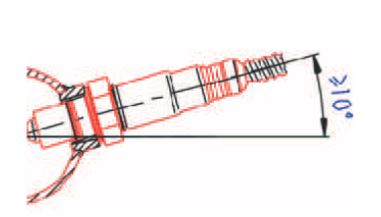
3. Mounting angle
The sensor must be installed at an angle of approximately 10–15 degrees above the horizontal plane (slightly angled upwards). This angle prevents condensation from collecting inside the sensor, which could otherwise damage it.
4. Weld bung and thread
Use an M18x1.5 weld bung, welded into the exhaust pipe at the chosen location. After welding, the thread must be cleaned and weld spatter removed. During installation, use high-temperature anti-seize paste on the thread (not on the sensor).
5. Cable routing
The wire must be routed so it does not touch hot surfaces or moving parts. Secure it with heat-resistant ties and make sure there is no tension on the cable.
6. Check after installation
After startup, check that the lambda sensor heats up and responds correctly (via ECU or diagnostic tool). Avoid leaded petrol or silicone products, as they can permanently damage the sensor.
Also see our range of lambda sensors and air/fuel ratio gauges.


